

When it comes to making homemade ice cream, you know that it is a science.
You have to follow the recipe exactly, and you have to make it correctly.
After you do all that, though, it must also be frozen to the right consistency.
Over time, it is likely to get hard.
Our goal here is to help you learn how to keep homemade ice cream soft.
In that way, you can enjoy it down to the last scoop!
Why Homemade Ice Cream Gets Harder Than Commercial Products
Generally, commercially prepared ice cream is slow-churned at the manufacturing plant.
This ensures that it stays creamy and soft.
Of course, that’s not the only reason it remains softer.
You are sure to find a variety of ingredients in commercial ice creams.
They feature emulsifiers, stabilizers, and other things that prevent them from freezing solid.
While you can add those to your homemade ice cream, it is likely to change the flavor.
Also, it could be hard to find these items at your local grocery store.
Though you could order stabilizers and emulsifiers online, it might be best to learn about alternative methods to keep the homemade stuff soft.
How to Keep Homemade Ice Cream Soft
It is important to follow the directions to make this sweet treat.
However, once it is made, you must freeze it to help it reach its desired consistency.
To do that, you should put it in an airtight freezer-safe container and place it in the freezer for up to four hours.
Then, the goal is for you to eat the whole lot in one sitting.
If you have a large family, that might not be an issue.
However, if you live alone or with a partner, you are going to find it tough to eat the whole thing at once.
When refreezing the ice cream, you may leave it overnight until you are ready for more the next day.
Unfortunately, come the next day, you would probably find that it is extremely hard and cannot be scooped easily.
Of course, you could try leaving it to sit out for a few minutes, but this is likely to make it soupy and could cause large ice crystals to form when it refreezes later.
The following helpful tips can make it possible to keep your ice cream soft until you eat it all:
Alcohol
Most adults learn early on that alcohol doesn’t freeze.
It’s common for people to put their liquor in the freezer so that it stays chilled and ready for mixed drinks.
Consider adding up to three tablespoons of 40-proof alcohol to about one quart of your ice cream mixture before churning it.
Many people prefer to use vodka so that they don’t taste the liquor in the ice cream or if they wish to prevent it from interfering with the flavors.
However, you can choose a kind of different alcohol to enhance the flavor if compatible.
Options like Armagnac and Grand Marnier are suitable for vanilla-flavored ice cream.
If you’ve got fruit-based ice cream, you could add kirsch.
This liquor enhances the taste of many fruits, such as nectarines, plums, berries, and peaches.
It’s best to add just enough so that the taste of the alcohol isn’t noticeable; this is usually a tablespoon or less.
For sorbets, you could add some rosé, white wine, or champagne.
About 1/2 cup of liquor could be added to a quart of your ice cream mixture before you serve.
Likewise, if the recipe calls to cook with water, substitute some of the alcohol for the liquor; how much you use depends on how much liquor you want to taste.
Sugar
Just like alcohol, sugar isn’t going to freeze, which is why you shouldn’t mess with recipes and reduce the sugar content willy-nilly.
Most homemade ice creams use white granulated sugar, but it’s possible to replace some or all of it with liquid sweeteners, such as light corn syrup or honey.
Both options can give your ice cream a less-icy, smoother texture.
The drawback here is that honey’s taste might not be compatible with the flavors of your ice cream, and corn syrup also has detractors.
If you rarely eat processed foods or drink soda, you may not want to start adding in such products to your homemade treats.
Generally, liquid sweeteners tend to be sweeter than traditional sugar, so you would want to use about three-quarters for each of your granulated sugar parts.
For example, if the recipe calls for one cup of granulated sugar, you should use ¾ cup of honey.
In some cases, you can substitute part or all of the granulated sugar with artificial sweeteners, too.
Splenda is quite popular, as well as Equal and others.
Most of these products tell you how many packets or tablespoons to use in place of the sugar you are substituting it for.
Gelatin
It’s also possible to use gelatin to keep your ice cream soft.
Soften the gelatin using cold water, then warm the water to melt the gelatin.
Next, add it to your sherbet or sorbet mixtures before you churn them.
Generally, it is ideal to use one teaspoon of powdered gelatin to a quart of your ice cream or sorbet mixture.
However, you can double that amount.
Just remember that if you use gelatin, it’s no longer edible by vegetarians, vegans, and people who must remain kosher.
Fat
Fat is one thing that doesn’t freeze well, though butter does because it’s about 18 percent water.
In most recipes, you don’t need to use a lot of cream and can replace cream with whole milk to achieve satisfying results.
The same applies to egg yolks.
Though it can be fun to watch chefs use tons of cream in their recipes, it’s not necessary, and most people don’t cook like that.
If you can add more fat to your ice cream, do so by substituting more cream in place of half-and-half or milk.
To be even more effective, add more egg yolks to the mixture to make it a custard-based homemade treat.
This is going to increase creaminess because of the egg yolk’s emulsifying properties.
Generally, recipes call for up to six egg yolks per quart, but you can add up to 10 yolks if you want.
Though many people are on a non-fat or reduced-fat kick, homemade ice cream is not the time to do that.
You can use non-fat milk and the like, but you are going to sacrifice quality and make the ice cream harder to scoop.
Stabilizers
Many times, professional pastry chefs use anti-crystallization agents and stabilizers in their sorbets and ice creams to help keep them smooth.
Options include alginates and pectins derived from glucose or seaweed.
While it is up to you to decide if you want to use these things, it can change the consistency of your mixture.
Most people make homemade ice cream to avoid all the extra additives found in pre-processed products.
Therefore, you may not want to use stabilizers and consider alternative methods instead.
If you do choose to give them a try, you are probably going to have to buy them online.
They should come with instructions on how much to use.
The Machine

Home machines are designed to churn at slower speeds than commercial machines.
Commercial products whip a lot of air into the ice cream, sometimes as much as legally allowed.
Therefore, homemade ice cream isn’t going to have the same fluffiness as the stuff you can buy at the supermarket.
Most home ice cream machines are designed to turn themselves off automatically once the ice cream is done.
In the last few minutes of churning, the sweet treat is likely to reach its maximum airiness and volume.
Therefore, it might be best to continue churning the ice cream once the machine turns itself off.
You can do this by resetting the timer and letting it churn for a few more minutes.
That way, you get more air into the ice cream regardless of the machine you use.
The Home Freezer
Your home’s freezer is primarily there to keep your frozen vegetables and ice cubes really cold.
It doesn’t necessarily work the best for sorbets and ice cream.
What you can do is turn the temperature of the freezer up, or you can store the ice cream in the freezer’s door.
The doors of the fridge and freezer tend to be warmer than the shelves.
This is also the reason why you aren’t supposed to put your milk in the door of the refrigerator.
Generally, though, the issue is that your ice cream gets too hard.
It can work to turn up the temperature a bit, but you might turn it up too much.
This means that your frozen goodies might not stay frozen, and that poses many problems.
For one, spoilage can occur, which means you lose the food you’ve been saving.
You may not realize it’s spoiled until you go to cook or smell it, which could be unpleasant, as well.
Storage
While storage may not make much of a difference for hard or soft ice cream, it might. Therefore, if you’re making large batches of homemade ice cream, it might be ideal to use individual containers in which to store it.
Most people are used to the ice cream you buy at the grocery store.
You can keep it in the freezer for months, and it is still going to taste as delicious as the first day you brought it home.
However, homemade ice cream just doesn’t have that level of staying power.
Unless you use a stabilizer, it’s not going to last as long as the commercial stuff.
Therefore, it might be wise to halve the recipe if it’s just for you.
Still, another option is to store it individually.
When you first take it out after the initial freeze, scoop it into small containers with lids.
Put those in the freezer and pull one out whenever you get a craving for a sweet treat.
Be Wary of Thermal Shock
Yes, you can freeze a large container of homemade ice cream, pull it out whenever the mood hits, and wait for it to thaw a bit.
However, when you do that, you run the risk of thermal shock.
In this case, the ice cream gets warm while it’s waiting to be scooped.
Then, you put the lid back on it and put it back in the freezer.
This allows ice crystals to form and can change the taste and texture of your homemade treat.
Also, ice crystals can make it harder to scoop the ice cream the second or third time around.
To combat this, store the ice cream in single servings.
If you don’t have enough freezer-safe containers to do this, consider parchment or wax paper over the surface of the ice cream.
This prevents it from coming into contact with air, which prevents freezer burn.
Cuisinart ICE-21R
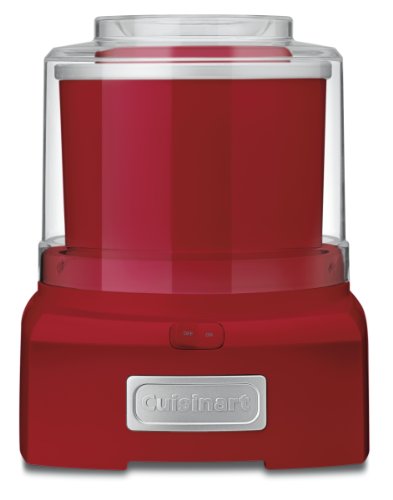
If you plan to make ice cream, there are many products you can use.
However, we feel that the Cuisinart ICE-21R is the ideal product.
It is 1.5 quarts and comes with a mixing paddle to make frozen drinks and desserts in about 20 minutes.
Features
The freezer bowl is double-insulated, so you don’t need to use any ice.
This is ideal because it takes out a step and reduces how many ingredients you are going to need.
You are going to find that the transparent lid is also helpful because you can see your frozen treat being made.
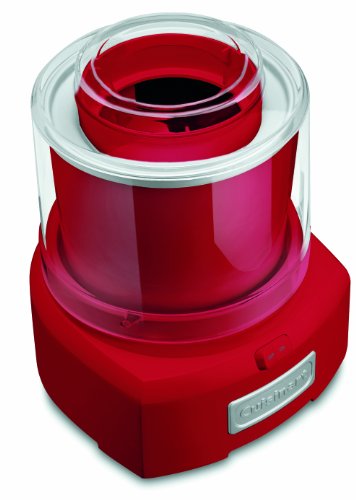
Plus, it locks easily to prevent messes while still allowing you to add ingredients as needed.
Of course, the ingredient spout is quite large and automatically opens at the right time.
This allows you to add things quickly and efficiently.
Pros and Cons
We like that this product is very easy to assemble, use, and clean.
It is also quite durable and offers airtight storage.
However, we were not impressed that the bowl isn’t dishwasher-safe.
This means that you must wash it by hand, which can take more time.
Conclusion
The taste and consistency of homemade ice cream are often the reason people take the time to make it.
However, keeping it at the right consistency can be a challenge if you plan to store it for days in the freezer.
Here, we talked about how to keep homemade ice cream soft.
We offered a variety of tips to help you.
In fact, you can try a few of them to see which one is best for your needs.