

Did you know that the United States produces 1.5 billion gallons of ice cream and other similar desserts annually?
If that isn’t enough to show how much we love ice cream, then how about the millions of people all over the country trying their hand at making ice cream at home?
The possibilities for creating homemade ice cream are endless, thanks to a bunch of quality equipment made available on the market and tons of recipes fit for every ice cream lover out there.
Whether you love fruit-flavored ice cream, coffee, or some of the more unique, experimental flavors, you can create them all in the comforts of home.
How to make ice cream at home step by step can go about in ways that make use of two different types of ice cream makers: the type that has a gel container and the kind that makes use of ice and salt.
How to Make Ice Cream at Home Step by Step (Gel Container)
Making ice cream at home starts like any other food prep wherein you gather all the necessary ingredients and equipment beforehand.
For this activity, you’re going to need the following:
- A cup of sugar
- 2 cups of whole milk
- Eight egg yolks
- A teaspoon of vanilla extract
- A cup of heavy whipping cream (half-and-half or light cream also works)
- ¼ cup of powdered, fat-free milk
- 3 cups of your preferred fruits
Once you have all that, it’s time to prepare the equipment.
Now, you ought to know that the ease (or difficulty) in which you make ice cream is so often determined by the machine you use.
For instance, you could be using the Cuisinart ICE-100 Compressor Ice Cream and Gelato Maker and end up breezing through the entire process and creating a batch of decadent frozen dessert.
Cuisinart ICE-100 Compressor Ice Cream and Gelato Machine
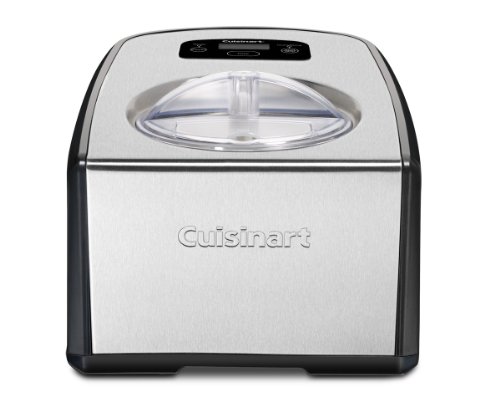
Cuisinart’s ICE-100 impresses in quite a few ways.
It’s fully automatic and has a commercial-grade compressor that allows you to create batch after batch of anything from light sorbet and creamy gelato to rich, decadent ice cream with virtually no waiting time.
Plus, its one-hour countdown timer and two gorgeous mixing paddles ensure that the end result is a bowl of thick, creamy ice cream with just the right consistency.
You can also experiment on a variety of flavors with the recipe book that comes with your order.
What’s more, you can also add variety to your frozen snacks and keep things interesting by adding some of your favorite ingredients, like tropical fruits, brownie bits, or chocolate chunks, during the mixing process.
The product has a see-through lid where you can witness the entire process unfold.
Once the 60 minutes on the timer are up, all you need to do next is wait out the 10-minute cooling cycle that lets your treat get nice and cool.
For optimum consistency, however, we advise that the mixture be transferred to a container with an airtight seal and chilled for at least 120 minutes.
Pros:
- Fully automatic
- Easy to use
- Has a 60-minute countdown timer
- Comes with two unique mixing paddles
Con:
- Difficult to clean
Now, don’t worry if this isn’t the kind of equipment you have.
For as long as your ice cream maker is the type that has a freezer gel canister, then you’re all good.
Along with this, you’ll need to prepare a large pot and either a wooden or plastic spatula.
Once you’ve got everything ready, let’s go ahead and let the ice-cream making commence!
Step 1: Deep-freeze the Gel Container
The first step begins the night or a few hours before you start the actual ice cream making process when you deep freeze the ice cream maker’s gel container.
The length of time you need to keep the unit in the freezer usually varies depending on the model, with some requiring at least six hours and others needing 22 hours of freezing time.
The coldness of your freezer also factors into the equation.
If space isn’t an issue, we recommend you leave the canister in the freezer the entire time.
In that way, you wouldn’t really need to put much thought and effort into this first step.
Shake the gel canister to determine if it’s completely frozen; you’d be able to tell that it is if there are no signs of moving liquid.
The bowl should be washed and dried before being placed in the rear portion of the freezer where the temperature is at its coolest.
Set your fridge to 0 degrees Fahrenheit as this is the ideal setting for frozen goods, including ice cream.
Pro Tip:
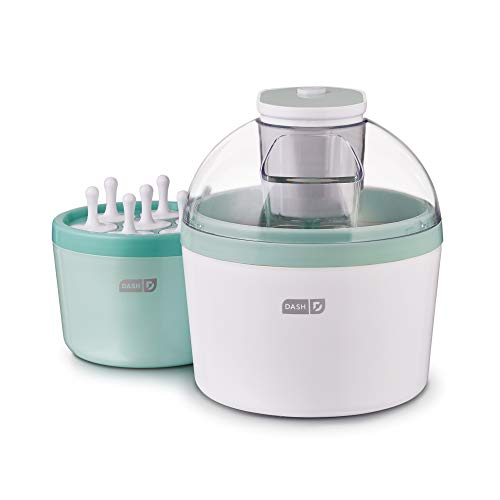
If you really want to get things done faster, get the DASH DIC700AQ Everyday Popsicle Ice Cream Maker, which will take you all of 20 minutes to make a quart of the most decadent homemade ice cream.
DASH DIC700AQ Everyday Popsicle Ice Cream Maker
With the Dash DIC700AQ, you can make a variety of homemade popsicles and ice cream any time you want.
This unit is designed with an ingredient sprout to simplify the entire process.
You just need to freeze the bowl, then switch on the machine and add your chosen ingredients.
Another quality that makes this ice cream maker really awesome is that it’s easy to clean.
We’re talking effortless cleaning that simply requires you to wipe the machine clean, and voila!
Furthermore, all of its non-electric parts are safe to use in the dishwasher.
This is an ice cream equipment that really doesn’t have too much going on but is still able to create the most sumptuous, mouthwatering homemade ice cream your family has ever had.
This machine really gives you tons of opportunities to switch it up and experiment with your frozen treats.
Whether you’re in the mood for frozen yogurt, sorbet, or just the regular popsicle, the Dash has got you covered.
If you have kids who just can’t get enough of ice cream, you’re going to want to have one of these lying around the house.
We get it; you’re probably thinking, “ice cream isn’t healthy”.
Well, with the dash, you can let your kids enjoy all the ice cream and popsicles they want without worrying about their health.
How? Just go for dairy-free and organic ingredients and give yourself some peace of mind.
Pros:
- Simple and easy-to-use
- 20-minute ice cream
- Easy to clean
- Dishwasher-safe
Con:
- The motor is difficult to remove
Step 2: Prepare the Mix
Using the large pot (one with a capacity of at least four quarts) with a heavy bottom part (for equal distribution of heat), mix the sugar, milk, and powdered milk together.
The mix should then be brought to a low simmer over moderate heat and stirred so that the sugar dissolves.
You then turn the heat down and just keep the mixture warm.
Step 3: Add the Eggs
Start cracking those eggs and carefully separating the yolks from the whites.
Crack them against the edge of the counter or the bowl, and use your fingers to drop the egg whites while holding on to the yolk or pour the yolk and the whites from one-half of the cracked shell to the other until all the whites are drained.
Step 4: Whip!
Now comes the really fun part—the whipping.
Placing the yolks in a bowl, whisk them until you achieve a rich, thick texture, which is probably going to take all of two minutes.
You can opt to whisk by hand or use a hand mixer set on low speed.
Step 5: Pour in Hot Milk
While whisking those egg yolks, you’ll want to add a cup of the hot milk mixture and whisk a little bit more until both mixtures and are properly blended.
Again, this should take you just a few seconds to do.
Step 6: Add the Egg and Milk Mix to the Pot
Now, what you’re going to do next is pour the yolk mixture back into the pot and bump up the heat to medium.
You then need to stir the mixture constantly using a plastic or wooden spoon until it achieves a thick and creamy consistency similar to gravy.
This gravy-like mixture must register somewhere between 170-degree Fahrenheit and 180-degree Fahrenheit temperature range.
You can get an instant read on the temperature by using a special thermometer with a probe.
Step 7: Put in the Fridge
Start pouring in that heavy whipping cream (half-and-half or light cream) and vanilla extract into your mixture before popping it into the fridge for at least six hours prior to the next step.
You can even go as long as two whole days before proceeding to Step 8 if you feel that it would work better for you.
Step 8: Choose a Flavor
Now is the time to decide the flavor.
There’s a whole variety of fruits and other ingredients to add to your mixture.
If simple vanilla-flavored ice cream is all you want, then use the ingredient you have and pop it into the ice cream maker.
If you want regular chocolate, fudge brownies, or chocolate chip cookies, then you can skip the fruit part and go straight to adding any of these ingredients in Step 10.
Of course, we’re going to assume that you’ll want something fruity for this particular batch of frozen treats.
When preparing to mix in fruit into your blend, place the fruit in the processor for a couple of minutes until it becomes nice and blended.
Keep the following tips in mind:
- Remove skins and bruised areas for peaches, bananas, and other similar fruits.
- Remove the green parts or the cap for strawberries.
- Wash the raspberries.
- Go for seedless blackberries unless you don’t mind removing seeds.
- Remove bruises and stems for figs.
- Remove the skin and slice off the flesh from the seed for mangoes.
Step 9: Add the Flavor to the Mix
Before serving your ice cream, you’ll want to stir the cream and milk mixture together with the blended fruit.
Make sure to stir it thoroughly before pouring in the fruit, milk, and cream mixture from step number 8.
Then, place the canister in the ice cream maker.
Step 10: Let the Ice Cream Maker Do Its Magic!
You’re almost there!
Power up that ice cream maker and let it work its magic for 25 minutes.
For chocolate ice cream, this is the perfect time to add some chocolate syrup and create an even richer flavor.
A half-cup of syrup is usually enough, but you can always go for more (or less) depending on your preference.
It’s easy to tell when you’re done.
Just check on the ice cream’s consistency through the opening at the top of the machine.
The motor’s straining sounds are also another indication that the ice cream is just about ready to serve.
Once the process is done, you should have ice cream that’s soft and creamy with just the right consistency.
If you prefer it firmer, then transfer your ice cream into a container with an airtight seal and pop it into the freezer for the next two hours.
Step 11: Enjoy!
Once your ice cream turns out just the way you want it, it’s time to enjoy your homemade ice cream!
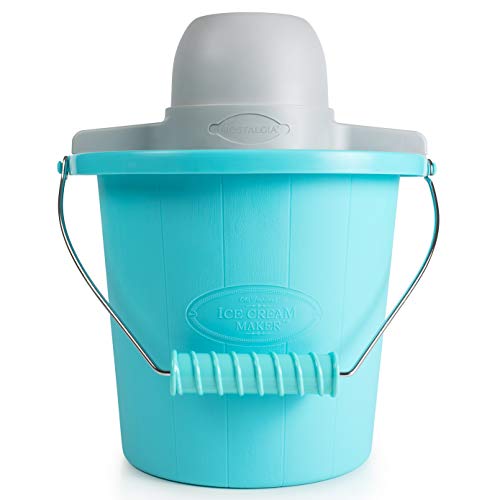
Now, before we let you go, there’s one more ice cream maker that we think might be a good addition to your kitchen—the Nostalgia PICM4BG Electric Ice Cream Maker.
Nostalgia PICM4BG Electric Ice Cream Maker
The Nostalgia PICM4BG Electric Ice Cream Maker makes it easy for you to create batch after batch of delicious ice cream, gelato, or frozen yogurt for your entire family.
It can make up to four quarts of ice cream, which makes it awesome to have for parties, gatherings, barbecues, and other events where you have guests over.
This unit is a breeze to clean up with its plastic bucket that allows you to easily wipe away any mess.
Cleaning tends to be an issue with other models, but certainly not with this one.
Plus, you get a secure carrying handle that allows you to move your ice cream wherever it needs to go.
With a powerful electric motor, as well as a secure motor lock to keep all parts secure, the Nostalgia is really everything a beginner ice cream maker could ever want.
This is a different type of ice cream maker that makes use of salt and ice, so there’s no need to freeze the gel container or canister overnight before you begin the process.
Pros:
- Easy to clean up
- Easy to carry
- No need to put any manual effort
- Makes homemade ice cream in a breeze
- Locks in place
Cons:
- The aluminum bowl is thin
- Motor quality is questionable
Final Thoughts
There may be a lot of popular ice cream flavors and brands out there, but there’s something extra special about being able to add your personal touch into this frozen treat.
You can do just that with the help of quality ice cream makers that allow you to create (or recreate) the flavors that you love so much in the comforts of home.
Learning how to make ice cream at home step by step is not at all difficult, nor does it take too much time.
When you have the right guide and premium-quality ice cream making equipment to assist you in the process, you’d have no problem making your favorite frozen treat at home.